

 This is a short tutorial on how I start the rounds, how the colors are worked with the main and contrasting colors, as well as how to carry the yarn up at each round. There are a million different things you can do in regards to color combinations, so feel free to experiment as you like.And you don’t have to work them in the Woolike, feel free to use any worsted weight or other yarn that you like. I have several patterns on the way in a worsted weight; a few with different color combinations, as well as a few using this yarn and these gorgeous fall colors. So stick with me to see what’s in store…
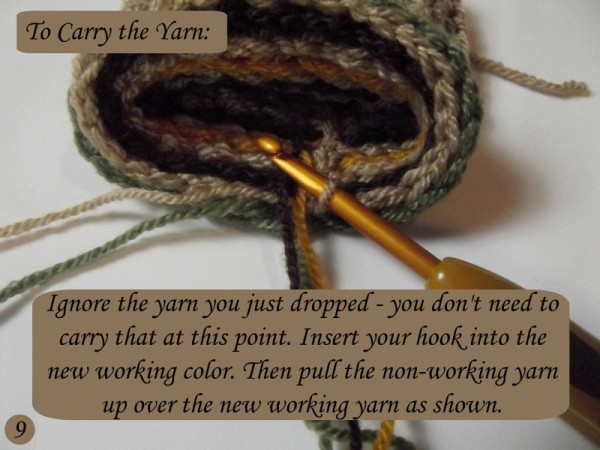
For this pattern you will be working with a main color as well as contrasting colors. The main color is worked in every other row, whereas the contrasting colors can be changed up as you like. You will need to carry your yarn up at each round, and I’ve included to images on that towards the very end.
1.) To start the pattern, I worked my rounds of ribbing until desired height. Then to begin the cool stripes I continued the first round with the main color. The stitch pattern is a (fphdc, ch 1) in every other stitch around. Join the round and drop the main color.
2.) This probably goes against all crocheting rules, I don’t know. But I worked the next round into the exact same round as the last round, only this time I worked into the stitches that I skipped earlier. (Refer to arrows in image). And as before, you will continue to make a (fphdc, ch 1) into every other stitch. (See step 3)


3.) With the main color dropped at the back, I joined the new color with a standing crochet stitch – a standing front post half double crochet, to be exact. The stitch pattern is the same, you work a (fphdc, ch 1) into every other stitch two rounds below. To make it easy, starting at this round and onward, you always work the next round directly into the stitch that falls below the chain 1 space. This way the ch-1’s get covered.4.) Once you’ve worked your way around with the contrasting color, join the contrasting round and drop the loop. I like to pull it long so it won’t unravel as you’re working the next round. You could also place a stitch marker into the loop to ensure it stays put.


And that’s it! Hope you have fun, and stay tuned for the upcoming patterns. source